YesLaw Online Attorney Tips
|
|
Adding Hyperlinks to Clips,
Documents, Issue-Bookmarks, Highlights and Web Pages |
|
|
Welcome |
|
Welcome to
YesLaw Online. This web service allows
users to view deposition transcripts, linked exhibit documents, and synchronized
video; highlight, annotate, and make video clips of important transcript
passages, and share this work with others via the internet. |
|
YesLaw Online is the solution to: |
|
§ Easily and instantly share large video clips within the office
or across the country |
|
§ Quickly search all exhibit documents, deposition
transcripts, and video within the case |
|
§ Organize and share large document deposits for complex
litigation |
|
§ Securely share large documents with consulting attorneys
or expert witnesses |
|
§ Edit and organize deposition video clips for case
presentation software like Sanction™ |
|
§ Consult with other attorneys on issues using a free-form,
multi-user wiki forum |
|
YesLaw
Online compliments the YesLawCD and YesLawDVD products you receive from your deposition
service provider that includes synchronized transcripts, linked exhibits,
video, and the software to highlight and annotate the transcript, make video
clips, and share this work with others. |
|
This help file provides an
introduction to the YesLaw Online Transcript-Video Viewer. The following few pages should answer most
of your questions regarding the YesLaw Online Transcript-Video Viewer;
however, should you not find the answer here you might contact us by email
at support@yeslaw.net
or through our toll-free telephone number (800.910.5009). |
Help |
|
If you are
having trouble, the following paragraphs provide instructions to overcome the
most common difficulties. |
I Cannot View Documents – I Keep Getting a Browser Error |
|
If you
running a browser other than Internet
Explorer, trying accessing the site using an Internet Explorer browser. |
|
If you are
running Vista with User Access Controls enabled, running
Windows 7 and have selected
anything but the lowest security setting, or otherwise are having difficulty viewing
documents, please try the following... |
|
Select the
My Profile menu item (the far left
menu item at the top). |
|
|
|
Then check
the Use Java applet Viewer
checkbox item (the last item on the list).
Once the checkbox is checked, click Update My Profile. |
|
|
|
|
Getting Started |
|
Welcome to YesLaw Online. To make full use of the site, you will need
to turn-off your web browser pop-up blocker software as the video and
documents are viewed within separate, pop-up windows. To view documents, you will need to give
permission to allow an ActiveX control to download and install the first time
you view a document. This need only be
done once. The site also requires secure, encrypted internet communications
(https). If you are behind a proxy
server or firewall that prevents secure communications, you will be unable to
access this site. Contact you network
administrator to allow HTTPS, Port 443 web communications. |
Use with Internet Explorer |
|
Within Internet Explorer, from the
Tools menu, select the Pop-up Blocker/pop-up Blocker Settings…
menu item shown below. |
|
|
|
In the Address of Web site to allow: entry box, type *.yeslawonline.com and click the Add button. Confirm the entry is added to the Allowed sites: list and click Close. This need only be done once. |
|
|
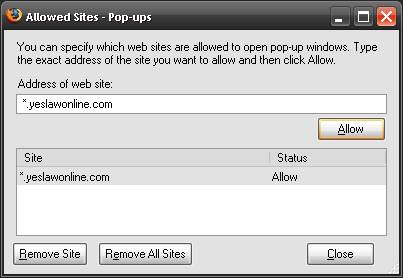
Use with Firefox |
|
Within Firefox, select the Options…
from the Tools menu. |
|
|
|
Then select the Content tab and click the Exceptions button opposite the Block pop-up windows item. |
|
|
|
In the Address of web site: entry box, type *.yeslawonline.com and click the Allow button. Confirm the
entry is made to the Site list and click Close. This need only be done once. |
|
|
Use with Safari |
|
Within Safari, you will need to disable the pop-up blocker by selecting Preferences… from the Edit menu, then
select the Security tab. Then ensure that the Block pop-up windows item is unchecked. |
|
|
|
Alternatively, you may use the
keyboard shortcut: hold down both the Ctrl
and Shift keys and type the letter
“K.” |
|
|
|
The current status of the blocking
software is shown by a check mark adjacent to the Block Pop-Up Windows menu item within the Edit menu. If the check
mark is present, pop-up windows are being blocked and you will need to
disable this blocking. |
|
|
Online Repository Use Cases |
|
This
on-line repository can be used in a number of different ways by end users: |
|
§ Case Repository for Transcripts, Video, Exhibits,
Documents and Discussions |
|
§ Document Depository |
|
§ Deposition Library |
|
§ Training Library |
|
§ Firm Wiki or Forum |
|
§ Settlement Negotiations and Trial Preparation |
|
|
Case Repository |
|
Transcripts, deposition video, and
deposition exhibits will be supplied by your deposition service provider –
court reporter and/or legal videographer.
As a user, you may upload documents to the case as well. Uploading documents is a secure and easy
way to transfer large documents or document sets to other users across town
or across the country. |
Document Depository |
|
You may be provided on-line access
to document deposits for complex litigation matters by your court reporting
company through this web interface.
The reporting company provides this convenient yet secure view access
as a service and may further allow you to order document set or deposit hard
copies as an additional service. To
ensure the integrity of the documents, users have view-only access and cannot
upload additional documents nor edit the existing documents within the
document deposits. |
Deposition Library |
|
Attorney firms may wish to
accumulate a library of video depositions for a series of similar cases. On-line access allows attorneys and expert
witnesses across the country with internet access and a web browser to easily
view deposition transcripts, videos (including designated video clips) and
exhibit documents without concern for video formats and software licenses. |
|
The Deposition Library may also be
used as a library of deposition content for internal training and
reference. More senior attorneys may
direct junior attorneys to examples of how to handle difficult situations with
depositions. This library may be thought
of as a “game film” library where examples of opposing counsel’s and expert’s past depositions may be reviewed in preparation
for an upcoming deposition. |
Training Library |
|
Although this repository
anticipates the special needs of hosting deposition content, the library may
include general training material – not deposition content – including
employee training content. To maximize
the use, convenience and effectiveness of the library, though, the video content
should be transcribed to more easily locate specific topic areas or content
for review. This enables users to do
text searches to find the specific content quickly. |
Firm Wiki or Forum |
|
The on-line wiki or forum feature
lends itself for users to post discussions, recent events and their legal
ramifications, topic reference documents, and possible boiler-plate contract
language for consultation within large firms. |
Settlement or Trial Preparation |
|
As a case develops, and
depositions are taken and reviewed, users will inevitably book mark
significant case material and make video clips of important video deposition
responses. Many of these video clips
will be used ultimately in settlement negotiations and perhaps trial. This website includes video clip export to
trial presentation software such as Sanction to minimize rework to recreate
clips within the trial software when trial becomes unavoidable. Organization of Case Material
Case material is presented in a
familiar “case tree” structure with each case a separate entry in the case
tree at the highest level in the hierarchy. |
|
|
|
|
|
Within each matter, material is
then organized with like material.
Video and video depositions along with related material such as video
deposition exhibits are located within a folder named Videos. Transcripts (without video) are located
within a folder named Transcripts.
Documents are stored in a folder named Documents. And Discussion or Issue threads are located
within the folder named Discussions / Issues. |
|
Within the Videos folder, each video
deposition is listed by deponent and deposition date. Then within each video or video deposition,
the edited video clips, exhibit documents, and transcript highlights (for
issues) and bookmarks (for quick re-locating content) have their own
folder. To view a video deposition,
mouse-click the video deposition and video and transcript viewer window will
open. More on the use of
transcript-video viewer later. |
|
To view only a previously edited
and saved video clip, click on the video clip within the Clips
folder. Similarly to view an exhibit
document, click on the exhibit document within the Exhibits folder and a document
viewer window will open. |
Document Manager |
|
The Document Manager Tab, located at
the bottom of case tree window, is used to create a new folder or rename an
existing folder, update information for an existing folder, delete a folder
and delete a document. Mouse click the
Document Manager tab, and select the function to be performed. When creating or renaming a folder, the tab
will require the new name of the folder.
To upload a document, you will be required to browse your computer and
select the file to be uploaded. During
the upload process, the application will request additional meta data for the
file. This meta data, such as Bates
stamping information, is optional but will enable faster and more convenient
use through faster advanced searches, document sorting, and document
summaries. |
|
|
Playing the Deposition Video |
|
To play the video, you may click a
transcript line and the video will play the video from the corresponding
video location or you may click the Play-Pause button ( |
|
To jump forward to the beginning
of the next page within the transcript, click the next page button ( |
|
The playback speed can be
increased to scan quickly forward through the video by selecting the fast
forward scan button ( |
Highlighting Deposition Transcript |
|
To highlight portions of the
transcript text, click-down and drag over the desired transcript text and
then click the highlight button ( |
|
|
|
To change the text description of
the Issue/Color, click on the existing description, and you may enter a new
issue description. |
|
|
|
To select a new highlight color
for the issue, click the color selector control ( |
|
|
|
To remove the highlight from a single transcript passage, click the
remove highlights button ( |
|
|
|
To remove all the highlights from
a transcript, you may select the Delete All Highlights from the Edit menu. |
Searching Transcript Text |
|
To search the transcript text,
click in the Search Term Entry box and type in your search term, then click
the Go button ( |
|
|
|
|
|
Once the entire transcript has
been searched and all hits have been shown, a message box will appear to
indicate the entire transcript has been searched. This will warn you when you have searched
the entire transcript text and are now duplicating your search. |
|
|
|
Search from the deposition
transcript-video viewer only searches the transcript text. To search across all transcripts, exhibits
and documents for the case, use the comprehensive case search function. |
Exhibit Hyperlinks |
|
An exhibit link connects a
document to a transcript passage and allows a user to quickly click and view
a document mentioned in the transcript.
The hyperlink will appear in blue, underlined text similar to links
within web pages such as used at |
|
To view a linked exhibit, simply
click on the hyperlinked transcript text.
You’ll recognize the links by the blue colored, underlined text and
the exhibit icon to the left of the transcript text. |
Video Clips |
|
Managing your synchronized
deposition video online makes the use of video so easy it is much more likely
to be used. Digging through archives
to find the video media, locating the proper player or software, and then
watching the video to find the desired content is not convenient. It is so cumbersome; attorneys relegate
video only for trial. With online
access to video, finding video is simply a matter of logging in and text
searching the transcript. Because the
video is synchronized to the transcript, clicking on a transcript line
immediately plays the corresponding video.
Online tools enable simple video clip creation. Other users can login to view the clips or
the clips can be emailed by including a hyperlink within your email. No special software license or software
install is required for viewing clips, just a web browser and internet
access. |
|
If and when it comes time for
trial, the clips can be emailed as a hyperlink to opposing counsel and the
judge for review. Requested changes
can be made instantly, online and new clips emailed. Powerful video evidence is now easy and
convenient. |
Making Video Clips |
|
To make a video clip, click and
drag over the corresponding transcript text and then click the
make-video-clip button ( |
|
|
Editing Video Clips |
|
To edit an existing video clip,
recall the Video Clips window by clicking the Video Clip button ( |
Merging Video Clips |
|
To merge existing video clips,
recall the Video Clips window by clicking the Video Clip button ( |
Deleting Video Clips |
|
To delete existing video clips,
recall the Video Clips window by clicking the Video Clip button ( |
Emailing Video Clips |
|
To email a video clip to another
user, click the email video clip button at the bottom of the transcript ( |
|
|
|
Alternatively, once the clips are
selected, you may copy that will be sent to the other users by clicking the
Copy URL button ( |
|
To clear your selections and begin
again, click the Reset button ( |
Searching Depositions and Documents |
|
The
SEARCH tab provides tools to search the documents, deposition transcripts,
and deposition video clips. Two radio
buttons near the top of the search tab selects whether the search is across
the selected case or all the cases shown to the left. The search is initiated by entering a
search term or phrase into the provided Search field and clicking Go. |
|
|
Advanced Searched Tools |
|
To
access the “Advanced Search” functions click the blue Advanced Search text to the right of the Go
button and the screen will update with additional search options. To create
your advanced search query, fill in the fields provided. They are fairly
self-explanatory, but described in more detail below. As you enter your
search terms, the search query is created and shown in the Search Query box
near the bottom. If the fields above do not provide enough space for your
more complicated search queries, you can manually enter your search query
using the model of the automatically generated search query created by
entering words or phrases in the fields above. That is you can create more
complicated queries than allowed by the limited fields above by using the
generated queries as a model and entering you more complicated queries
directly into the Search query box at the bottom. |
|
You
may save your searches to be used again at a later time using the Save
function at the bottom of the SEARCH tab. |
|
|
Boolean Search Option |
|
To find documents containing one
or more words, simply enter the search words.
To find a phrase, enter the phrase in quotation marks. To exclude documents from the search
results if it contains a certain word, enter the word in the NOT field or
place a “minus sign” in from of the term in the Search Query entry box. To find documents that contain one word OR
another word, enter the options in the OR fields or enter the words in the
Search Query box divided by the word “OR.”
For example you can enter apple
OR banana. To find documents that
contain the word apple or banana and the word pie but not the word blueberry, |
Proximity Search Option |
|
To find all occurrences of a word
or phrase that appears within n
words or another word or phrase, use the proximity search. For example, if
you enter apple within 1 word of pie, apple pie, apple
rhubarb pie and apple crunch pie will be found but not apple
and blueberry pie as “and blueberry” are two words. To use a proximity
search within the Search Query entry box, place a “w/” followed by the number
(0-9) of intervening words between the two search terms. So to find apple
within one word of pie, enter apple w/1 pie. |
Stemming Search Option |
|
Enabling the stemming option will
find different forms of the search word. So with the stemming search option
enabled, a search for bake would find all occurrences of bake, bakes,
baked, and baking. To enable the stemming option in the Search
Query entry box, append an asterisk to the end of the word (bake*). |
Fuzzy Search Option |
|
The fuzzy search is used for
perhaps poor copies of documents that have been OCR’d.
The copy may be sufficiently poor that the OCR software may misinterpret an e
as a c. With the fuzzy search option enabled and the letters parameter set to
1, the search algorithm will find all occurrences of the search word and
words that differ only by one letter. So a search for the word parts
with the fuzzy search option enabled would find all occurrences of parts,
|
Synonym Search Option |
|
With the synonym search option
enabled, the search engine finds all occurrences of the search term and
synonyms of the search term. So if you were to search for the word search,
the search engine would also find the words seek and look. To
enable the synonym option in the Search Query entry box, append an ampersand
to the end of the word. So to find all occurrences of search and
synonyms of search, enter search&. |
Phonic Homonyms Search Option |
|
With the phonic homonym search
option enabled, the search engine finds all occurrences of the search term
and homonyms of the search term. So if you were to search for the word break,
the search engine would also find the word brake. Or if you were to
search for their, the search engine would find there, and they’re.
To enable the homonym option in the Search Query entry box, precede the word
with a “pound sign” (#). So to find all occurrence of brake and
homonyms of brake, enter #brake. |
Issues/Discussions
– Your Online Shared Case Notebook
|
|
All online cases have an
Issues/Discussion forum or wiki found in the case tree and represented by the
discussion bubbles: |
Adding an Issue/Discussion |
|
Issues are created by selecting or
clicking Issues / Discussions within the case tree and then clicking the |
|
|
|
Additional discussions can be added to an issue by first selecting the issue
within the case tree and then clicking |
Posting Comments |
|
To post a comment, first select
the issue/discussion in the case
tree, and then click |
|
|
Adding Hyperlinks to Clips, Documents, Issue Bookmarks, Highlights and Webpages |
|
Users can compose their comments with rich-formatted text and
include hyperlinks to |
Renaming Issues and Discussions |
|
Users have the ability to edit or
delete their (and only their) issues, discussions, or comments at any time by
clicking the [edit] link
immediately following the Issue or Discussion name in the Case Issue
Discussion tab (not in the case tree).
Issues and discussions may be renamed by the
creator. Discussions without comments
may be deleted by the creator, and issues
without discussions may be deleted
by the creator. |
|
This forum
becomes a powerful collaborative annotation tool to organize case content,
outline arguments, construct lists and share within
a workgroup. The function is far beyond yellow sticky notes, it is an online shared case notebook. |
|
|